Inhaltsverzeichnis
Testing and adjusting the calibration + a little gui (2018-12-18)
Tagged as: blog, calibration, gui
Group: E
In this two weeks we have completed a new iteration of our calibration up and running. In a testing session we found minor enhancements and thought of a future roadmap. Furthermore, our GUI is still in development.
Calibration
Our calibration process will now work like this: Moving the sensor „finger“ onto the button till we receive a signal. Then we will move it sequentially upwards until it doesn't press on the button anymore. After that it will press 100 times on the button. When the presses and the actual events coincide, we successfully calibrated a input device. We successfully tested this behavior with a mouse. However, Gamepads are another story. They are not constructed to lie flat (except XBOX 360 controllers) and sometimes have analogical buttons, which are not easy to use. The first problem would need a new testing construction, which we describe below. For now we clamp them in cramps. The second one is rather easy to solve. We just use digital buttons. Furthermore, we encountered different events on the same button. We solved this with the „-event“ argument. After using these (temporal) solutions we tested all three device types successfully.
Thoughts about the hardware architecture
Until now we have siginifacant problems positioning the hardware for the testing process. Only a slight movement could result in systematic errors and thus to an unreliable examination. Therefore, we would like to clamp the hardware and make sure it doesn't move while testing. Our idea would be some kind of holder that grabs the device and is strong enough to withstand our testing.

The upper image shows a rough sketch of our first try. There are four tapping screws as legs and a quadrangular construction. This results in an adjustable position for each device. Furthermore, the standing will improve by putting a plank onto it and positioning the device with rubber bands will fix its position. Alternativly, the length of the legs can be adjusted to customize the construction for each device.

After a few discussions and the creation of the 3D model, we hit on a problem: The tilt that results through the adjustable height probably bend the whole frame, because it's rigid. That's why we came to the conclusion, that a ball-bearing with a drilling could make it more flexible. Another approach would be an hinch between the frame and the thread.

Before we consult our supervisor, we came up with another idea. In this approach each screw „leg“ is secured by a nut to hold and adjust height. With bigger holes in the frame than in the first tryout, the tilt and height adjustments become more flexible. However, this solution could be too wobbly as the frame could slip. To solve this, we would use rubber seals to secure the screw in the bigger drilling.
GUI
Raspberry Pi (and ARM devices in general) and JavaFX are not so much harmonizing as we thought. Oracle doesn't support it anymore and the alternatives either didn't work, like receiving no touch input, or are way too much overhead for this project (https://stackoverflow.com/questions/36961054/can-javafx-be-used-on-raspberry-pi). We now use the javaFX library of OpenJFX 8v60 for armv6hf found at https://chriswhocodes.com/.
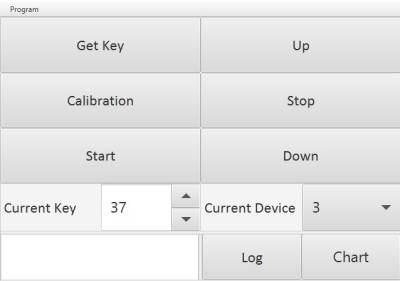
We defined a simple touch interface as seen in this picture. „Get Key“ is responsible for defining the key that is pressed on to calibrate and test a device. „Calibration“ starts the calibration process. „Start“ will start the whole test. „Up“ and „Down“ will move the pressure measurement up- and downwards. „Stop“ will cancel every mentioned command. Furthermore, you can define the current key and the current device mode by hand. Logs will be displayed at the bottom right. Whereas, buttons for additional views reside on the bottom left. „Log“ will open a bigger log view and „Chart“ will display the pressure chart, which will give insight to the pressure point.
Next, we will implement a logging printing and a pressure chart generation.
Future roadmap
In the next weeks, we try to find a solution for our hardware position problem and implement logging to our testing process.